
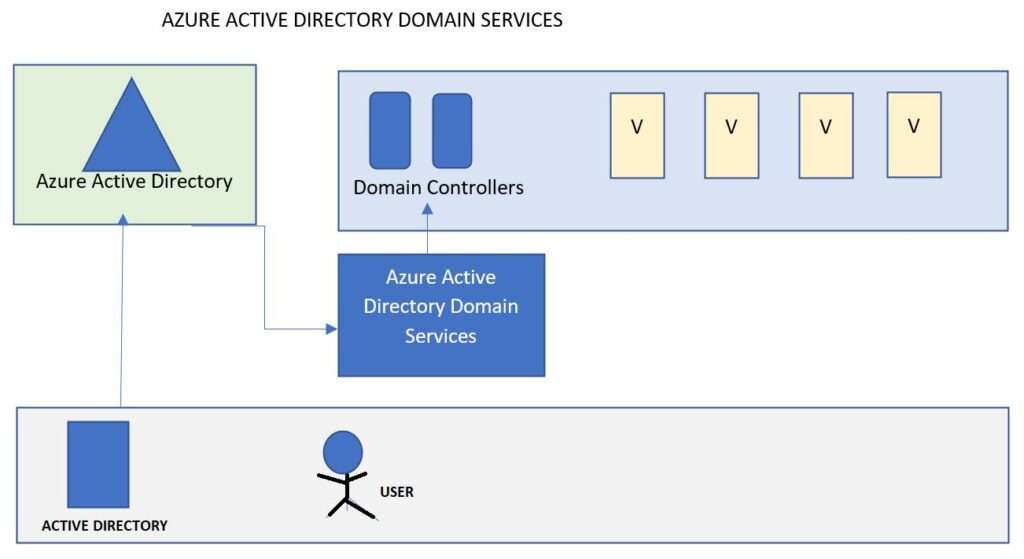
- A feature of azure active directory that provides domain doman services to VM.
- Azure active directory is different compared to Active directory on-premises. Both store user identities and groups of user. But Azure AD was buillt for the cloud and it uses web authentication protocols for authenticating users like OAuth 2.0 and OpenID connect. Cloud services like Azure app service use these protocols by default
Azure active directory
- Both store user identities and groups of user.
- But Azure AD was buillt for the cloud and it uses web authentication protocols for authenticating users like OAuth 2.0 and OpenID connect. Cloud services like Azure app service use these protocols by default
Active Directory
- Both store user identities and groups of user.
- Windows Integrated Authentication, which uses Kerberos and NTLM protocols.
- With windows Integrated authentication, user logs into a local network and a security token get passed around so they can get authenticated by any computer thats joined to the network, including web servers. That functionality is provided by domain services, which is just a part of active directory. Many legacy application uses windows integrated authentication. So if you are moving those to VM it will be showstopper. you dont want to modify the application to use another authentication method. Also for COTS(commercial-of-the-self software) products also you cannot change the authentication methods they use.
- Solution :- Azure Active Domain Services. Its not enabled by default , you need to turn it on, and it provides the ability to join virtual machines to managed domain where the user identities are stored in Azure AD, but the VMs can use legacy authentication methods like Kerberos and NTLM. When you set up Azure active directory domain services, azure actually deploys two domain controllers into your selected azure region and you dont need to manage or update them. Its handled for you. Information from Azure AD is synchronized into Azure AD Domain Services. Then, applications , services, and virtual machines connected to the manage domain can use common AD features like Domain Join, Group Policy, LDAP, Kerberos and NTLM authentication
- If you have on premise active directory – you can synchronise users and groups from your on-premises active directory to azure active directory. Thats not the same thing as joining 2 networks. They are still separate , there is an agent installed in your environment that synchronises the user accounts into azure active directory on a continuous basis. Then those users can be granted access to applications in azure. And even they are accessing the application from on-premises, it is their azure AD identities that are used. And they can still access applications hosted on those virtual machines that use legacy authentication protocols.
- Azure Virtual desktop is a desktop and app virtualization service in azure.
- Previously called as – Windows virtual desktop
- Azure virtual desktop is used to provide windows desktops to uses with computers actually running in azure.
- User logs into a computer in azure where all their applications are installed and all their data is accessible. Nothing is stored in local computer. Everything is on cloud. All the processing by the applications is being done in the cloud.
- Users can access thier remote desktop from applications from any device. Remote desktop can be accessed by web browser too.
- What problem azure desktop solves ?
- It separates OS, data and applications from local hardware.
- Central management of user desktops, with less IT management required. No desk side support as all apps are running remotely in cloud.
- Azure virtual desktop provides separate compute environment for user outside of their local device, chance of confidential information being left on the user device is greatly reduced.
- Ease of deployment
- You can choose windows 11 , 10 , 7 with extended support untill 2023. And also server operating system like windows 2022, 2019,2016 and 2012 R2. You can also create and upload all images with all the software and configuration needed for users.
- At sign in user profile is dynamically attached to the computing environment and appears just like a native user profile on a local machine.
- users have access to their own data and users with privileges can add and remove programs without impacting other users on the same remote desktops.
- Azure virtual desktop is similar to remote desktop services and windows server. But if you have ever set up that environment, you know there are multiple roles and multiple servers required for scalabiity. you can avoid all those by using azure virtual desktop.
- So its PAAS offering to provide remote virtual machines.
- In past if you wanted to provide client operating system Vms to users in remote desktop services, you had to have single VM for each user. To user multiple users use the same VM and conserve resources , you needed to use a server operating system, but azure virtual desktops win 10 or 11 multisessions which means you dont have to overprovision vms. you can let users share the resources of a single VM. Users on multisession environment still have unique secure experience and they can use all their apps like office 365. The users files and data are persisted on a separate disk that gets attached when user logs in so they get their desktop settings and application settings as if their own computer. But the user profile is separated from the operating system. So you can update the operating system and not lose the users profile.
- You can domain join azure virtual desktop to azure active directory domain services or to an existing domain in active directory if you have created a hybrid cloud.
- Azure AD provides a secure consistent sign on experience that allows users to roam from device to device. And it also lets you user azure multi-factor authentication for another layer of security.
- Now let’s talk about containers in Azure. Containers are a way to wrap up an application into its own isolated package. It’s for server‑based applications and services, so web apps are a typical example. When an app is deployed using a container, everything the application needs to run successfully is included in the container, like runtimes and library dependencies.
- This makes it easy to move the container around from your local workstation to VMs in your on‑premises environment that have the container runtime installed or to a managed container hosting service in Azure, like Azure Container Instances or the Azure Kubernetes Service.
- The main characteristic of a container is that it makes the environment the same across different deployments, so containers reduce problems with deploying applications.
- Let’s talk about how containers are different from virtual machines. Virtual machines run on some sort of infrastructure, whether it’s your laptop or it’s a physical server in a datacenter in Azure. There’s a host operating system that might be Windows, Linux or macOS. Then we have a hypervisor layer, and this is what runs the virtual machine and provides resources to it from the host operating system. Hyper‑V is Microsoft’s hypervisor technology, but there are others like VMware and KVM. And then there’s the virtual machine. The virtual machine contains a full copy of an operating system, and it virtualizes the underlying hardware, meaning the CPU, memory, and storage. It also contains the application that you want to run. If you want true isolation of your applications, you’ll have a copy of a VM for each application that you deploy, and that VM will need to have all the runtimes and libraries installed that the application needs.
- If you want to run three applications in isolation, then you’d be running three virtual machines on this hardware, each with a guest operating system that might be 800 MB in size, and each VM would require a certain amount of CPU and memory allocated to it because, again, virtual machines virtualize the hardware.
- Containers, on the other hand, virtualize the operating system. The host could be a physical or a virtual server, and on top of the operating system there’s a runtime. This is kind of like the hypervisor for virtual machines, but it’s for containers. And on top of the runtime are the containers, which just contain the application along with any dependencies for that application, like frameworks and libraries for connecting storage, for example. These are the same types of things you would normally install on a VM to run your application.
- The containers emulate the underlying operating system rather than emulating the underlying hardware. This makes containers smaller in size than a virtual machine and quicker to spin up because you’re only waiting for the app to launch, not the operating system. Because containers are so lightweight, you can host more containers on the host VM or physical server than using traditional virtual machines for each application, so there’s obvious cost savings associated with that.
- A container is an instance of a container image. An image is a read‑only template with instructions on how to create the container, and the container is the runnable instance of the image.
- You can create your own container images by leveraging existing images and adding the frameworks, any dependencies, and finally the code for your application. Then you can deploy the container in a repeatable way across environments.
- Container images get stored in a container registry. A container registry is a service that stores and distributes container images. Docker Hub is a public container registry on the web that serves as a general catalog of images.
- Azure offers a similar service called Azure Container Registry, which provides users with direct control of their images, integrated authentication with Azure AD, and many other features that come along with its Azure integration.
- Now I just mentioned Docker Hub. A Docker container is a standard that describes the format of containers and provides a runtime for Docker containers. Docker is an open source project that automates the deployment of containers that can run in the cloud or on‑premises.
- Docker is also a company that promotes and evolves the technology, and they work in collaboration with cloud vendors like Microsoft.
- Docker has a runtime process that you can install on any workstation or VM, and there are services in Azure that provide that runtime for you.
- Remember that containers are portable, so they can be moved around to different hosts.
- So now let’s talk about the different ways you can host containers.
- You can set up a local environment by installing the Docker runtime. Then you can develop your app locally and package up all its dependencies into the container image that you want to deploy.
- You could also host a container on‑premises on your own hardware or virtual servers by installing the Docker runtime there.
- You can deploy containers on your own VMs in Azure. If you just need a small dev environment or you’re not ready yet to move into container‑specific services, you can still package your application into containers and deploy those onto VMs that you control. Of course, you’ll need to maintain and patch those VMs, but it can at least get you started with some of the benefits that containers offer in terms of deployment and agility.
- With each of these approaches, you need to install the container runtime, but Azure has several Platform as a Service offerings for hosting containers.
- Azure Container Instances, or ACI, is a service that provides a way to host containers without having to maintain or patch the environment. It hosts a single container instance per image, so it’s intended for smaller applications like simple web apps or DevTest scenarios, but it still has obvious advantages to deploying containers to your own virtual machines because you get a managed environment where you only pay for the containers.
- Azure Kubernetes is a fully managed container management system that can scale your application to meet demands by adding and removing container instances, as well as monitoring the deployed containers and fixing any issues that might occur. Kubernetes is an open source project, and it’s one tool in a class of tools called container orchestrators.
- Azure Red Hat OpenShift is a service in Azure that’s a partnership between Red Hat and Microsoft, and it allows for running Kubernetes powered OpenShift. If your organization is already using OpenShift, this is a way to move to a managed hosting environment in the cloud.
- Azure Spring Apps is for hosting containers that run Java Spring apps, so it’s tailored to that specific platform.
- You can actually deploy containers to Azure App Service also. So in addition to deploying code onto Azure App Service, you can package web apps as containers and host them in App Service.
- You can also deploy containers to Azure Functions for event‑driven applications.
- And a relatively new service in Azure for hosting containers is Azure Container Apps. This is a managed serverless container platform for running microservices. This service is also powered by Kubernetes, but it doesn’t provide direct access to the underlying Kubernetes configuration, which makes management a lot easier. So the choice of how to host your containers comes down to the development platform your team uses, what orchestration platform they might be accustomed to, and how much control you want over the management of the service.
Creating an Azure Container Instance
Now let’s see how to create an Azure Container Instance. From All services, I’ll search for container instances. There are a few other services here, like Container Registry for storing your custom containers, and Container Apps, which is another service for hosting the running of your containers. But we’ll choose Azure Container Instances, a simple service for running single containers(the first one).
And let’s create one from the menu. As always, we need to choose a resource group to store the metadata about the container. I’ll choose the one we created earlier in the course. Let’s give this container a name, and this name only needs to be unique within the resource group. There’s a lot of regions we can choose from to deploy this container instance, but I’ll just leave the default. Next we can choose to deploy our container from a container registry. Azure has its own container registry service, or you could choose another service like Docker Hub, and that can be a public or a private registry with a login. But let’s choose a quickstart image just to get up and running. I’ll select the helloworld Linux image.
And you can change the resource requirements for the container if you’d like, so the number of virtual CPUs and RAM that the container uses.
Let’s close this and move to the Networking tab. Here you can create a public IP address and DNS name. So this will get prepended on the Azure service URL, and I’ll show you that in a minute.
You can configure environment variables here and the restart policy for the container. This is where an orchestration service like Azure Kubernetes offers a lot more functionality. We won’t add any tags. And let’s create this container instance. It’ll take almost a minute to create this in Azure, so I’ll skip ahead. And once it’s created, we can navigate into the container instance.
So we have some monitoring happening on the Overview page. And on the Containers page, there’s the container we created. It says the state is Running. Let’s go back to the Overview page, and the fully qualified domain name is here on the right. This is the DNS name we added with the rest of the URL provided by Azure. Let’s paste this into another browser tab. We get a basic web page that was served by the container, so we know the container is running in Azure Container Instances. Let’s go back into the container on the Containers tab. And there are logs available here, so you have some visibility into the output from the container, and you can even remote into the container and get a command prompt so you can run shell commands here. I can list out all the files and folders that are on this quickstart container. So it’s serving the default page using Node.js. That’s a quick look at containers and one of the Azure services that can host them for you.
Azure App Service
Now let’s talk about Azure App Service. I mentioned that you can use App Service to host containers, but it’s also the Platform as a Service(PAAS) offering for hosting code directly, meaning the App Service is more like traditional web hosting where the frameworks are already installed on the servers, like .NET, PHP or Java, and you can deploy your code onto those servers.
The difference with traditional web hosting is that Azure handles the management and patching of the underlying servers for you, but you do have lots of configuration options. Azure App Service can host web applications, API apps, which are web services that use the REST protocol, and it can host the back‑end code for mobile applications, which are really just web services anyway.
You can deploy containers to Azure App Service too, but you don’t have to. And there’s also a feature of App Service called WebJobs that let you run services on the underlying VMs of the App Service. WebJobs can run continuously or on a schedule. They can run as executable files or they can run scripts like PowerShell or Bash scripts.
So if you’re running Windows services on your on‑premises web servers now and wonder how you can do that in Azure, WebJobs offer that kind of functionality. There are other services in Azure to accomplish those types of tasks, and we’ll look at some of them in the serverless computing section.
App Service started out as a service called Azure Websites, and when you create a new App Service, the default URL is still suffixed with azurewebsites.net. And yes, you can use your own custom domain name with Azure App Service. This is just the default URL that first gets created.
So an App Service is basically an individual website or API web service or mobile back end that you host. They’re all really the same thing, just code that’s hosted on a web server.
Before you can create an App Service, though, you need an App Service plan. The App Service plan defines the size of the underlying infrastructure, which are actually just virtual machines in Azure. But remember, you don’t patch or maintain those VMs and you have limited access to them.
You can run more than one App Service on a single App Service plan.
When you create an App Service plan, you choose the size of the VMs, meaning the CPU, RAM, and storage by selecting the plan type, also known as the pricing tier. Depending on the pricing tier, you also have access to different features of an App Service plan. Let’s create an App Service plan next and explore the features of Azure App Service in the process.
Creating an Azure App Service
Let’s create an App Service. We won’t create an App Service plan first. We’ll just do it during the creation of the App Service. I’ll do that by using the shortcut on the left menu for all App Services in this subscription. Let’s create a new one. And the first thing is the resource group to put this App Service in. Let’s create a new resource group for this. I’ll just give it a name. And now let’s give this App Service a name. This name needs to be unique across all of Azure because it’s suffixed with azurewebsites.net. So this part here can’t be the same as any other website on all of Azure. But remember, you can add your own domain name later. This is just the default one for creating the App Service.
Next, we can choose whether to publish code or a Docker container or a static web app. For code, you choose a runtime stack, and this will be available on all the underlying web servers that the code is deployed to. The runtime you choose here will dictate which operating systems are available below. You can deploy your own Docker container from a container registry. And the Static Web App option is when you’re just deploying front‑end code. There’s no code running on the server, so there’s no runtime framework option. This actually brings you to another service in Azure for hosting these types of static web apps, and that service uses Azure Functions for back‑end logic. Static web apps integrate directly with GitHub or Azure Pipelines to pull your code, so it’s a serverless environment where you don’t need an underlying App Service plan. You can create one of these apps from the All services menu. I think it’s just here is an easier way to get to that service, but it does seem a bit confusing. Let’s choose a traditional code deployment, and I’ll choose .NET 6, which is available on Windows and Linux VMs.
Then we need to select a region where this will get deployed. If my subscription had an existing App Service plan in this region, I could choose to deploy the App Service onto that plan. But since it doesn’t, a new App Service plan will get created. Now because I’m using the free trial here, I don’t have the option to change from the free pricing tier. So to give you the full experience, I’m actually going to switch over to the subscription in my Visual Studio account. I have all the same options chosen up to the App Service plan. And for this region, I have several existing App Service plans that I could deploy this App Service onto. They’re all using the free pricing tier right now because I’ve scaled them down to that plan to save money. Let’s create a new App Service plan, and I’ll give it a name. And now we can change the size, which is really changing the pricing tier. It defaults to the S1 pricing tier under the Production grouping of tiers, but we can switch to the Dev group. Below the pricing tiers are the options that are available for each one. As I change pricing tiers, features are added. With the D1 pricing tier, we can use custom domains. At B1, we can add VM instances manually when we want to scale out the resources to handle increased load. And at the S1 tier, we get autoscale and staging slots and all the features we need. Going up from there just increases the amount of CPU, RAM, and storage on the underlying servers. So let’s choose this S1 tier, and let’s move to the Deployment tab.
Here we can set up continuous deployment so our code gets pulled from a GitHub repository automatically. Let’s move on to Networking. We could make it so this App Service is able to call into resources in a virtual network. Let’s leave the default, though. And on the Monitoring tab, we could create an instance of Application Insights, which would collect all sorts of metrics from the App Service, like user behavior and performance of the app. But let’s turn this off for now. We can enable it after the App Service gets created.
We won’t create any tags, so let’s create this App Service. Once it’s ready, let’s actually go to the tab with all the App Service plans. This is the plan that was created with the App Service. In the App Service plan, there’s a tab for apps. There’s only one App Service here, the one we just created. Further down the menu, you can change the pricing tier if there’s features you need to use or you just need more powerful VMs.
And on the Scale out tab, depending on which pricing tier you’re on, you can add VMs to the plan. And, of course, there are costs associated with that. And you can also configure autoscaling. So when a certain metric is reached, more VMs will be added.
In the list here, there are lots of metrics you can have the App Service plan watch, like the amount of CPU being used, the disk queue length, and the percentage of RAM being used. Then you can configure some logic to add or remove VMs under certain conditions. Let’s close this though, and let’s go back to the Apps tab and drill into the App Service we created.
So this is a web app that can use .NET for its server‑side logic. We haven’t deployed any code here, but there is a default page created for you that you can access from this Browse button. That opens up a tab with the URL that we chose during creation, so we know that the servers are running and serving content.
Back in the App Service, let’s explore some of the things we can configure. You can add a custom domain. You can either purchase that through a third party and just verify it here in which case you’d need to point your DNS provider to this IP address or to the URL that you saw on the browse page depending on the type of DNS record that you use, or you can actually buy an App Service domain through Azure right here in the portal.
Let’s look at the Configuration tab. This lets you add name value pairs that can be read by your application code. You can also add connection strings to databases here. This lets you keep configuration and secrets out of your code. If you’ve written ASP.NET applications before, you know there’s a configuration file in your project. Any values here with the same name as what’s in that file will override the values in the file, so administrators can manage configuration in the portal here.
Notice there’s a checkbox for deployment slot settings. Deployment slots let you create different environments like dev, user acceptance testing, and production. So you can have a different version of your web app in each of them, and you can promote your web app through the environments from right here in the portal, and the application settings and database connection strings that we saw can be unique to each deployment slot. So the code gets promoted and the values change for each environment.
Now let’s take a look at authentication. One of the great things about Azure App Service is that you can let it handle authentication for you. You just choose the provider that your user base uses, and you can use multiple providers. You could use Azure Active Directory, so accounts need to exist there. Or you could use outside authentication providers, like Facebook, Twitter, or pretty much any service that uses this protocol called OpenID Connect. That works with OAuth 2.0, which is a standard on the web. Remember we talked about that when we talked about Azure Active Directory Domain Services. So let’s close out of this, and let’s move down the menu.
One of the scary things about turning over management of your web servers to a third party, even Microsoft, is how do you troubleshoot that when there’s a problem? Same with a deployment. You don’t have access to the file system directly, but you can turn on quite a bit of logging, including logs from the web server and from the application. Those can get stored in Azure Storage as files, or you can have them written onto the local server in the App Service plan, in which case you can actually stream them from here and see the logging in real time. You can stream the logs onto your local computer using Visual Studio or PowerShell also.
There’s a lot more here that can help you with troubleshooting. Under the advanced tools, there’s a link to the Kudu portal. That’s an application that gets installed with your App Service that provides all sorts of information about the environment like system information and environment variables on the servers.
And under the Tools menu, there’s a way you can deploy your web app by dragging a zip file containing the website right into the browser here. There are a lot of other ways to deploy apps to Azure App Service too, but we’ll stop here with the demo. Next, we’ll look at serverless computing in Azure and Azure Functions in particular.
Serverless Computing in Azure
Now let’s talk about the idea of serverless computing. There’s always servers involved in Azure. The term just really refers to how little you might need to interact with those servers. Serverless computing is about letting developers focus on the code and business logic that they’re developing and not on the underlying infrastructure.
The environment is set up for you, and it scales automatically to meet demand, but you don’t need to do any configuration to make that happen, even the minimal config you need to do with App Service or virtual machine scale sets.
Serverless computing also differs from the other compute models you’ve seen in that you’re only charged when the code runs, so you don’t need a virtual machine or an App Service running, waiting to do the work.
The two main services in Azure that are considered serverless computing are Azure Functions and Azure Logic Apps. Logic Apps don’t really fall under the Azure compute category. They are now categorized as part of the integration category of services, but they’re used so often with Azure Functions that it’s worth mentioning here.
Both of these services can be used independently, but are often used together to build solutions. Azure Functions allow you to run small pieces of code that you write yourself. Functions are started by triggers, which could be an HTTP call to the function endpoint, an event that happens in another Azure service, like a blob getting created in Azure Storage, or you can run the code based on a timer event. You can write functions in C#, Java, JavaScript, TypeScript, Python, and even in PowerShell. Azure Functions can run completely serverless, and this is called the consumption‑based model. But if you already have an Azure App Service plan that you’re paying for, you can also leverage that to host Azure Functions.
Azure Logic Apps allow you to design workflows right in the Azure portal, so you don’t need to write any code with Logic Apps. You can automate business processes when you need to integrate apps, data, and services. Logic Apps have a huge library of connectors to everything from SharePoint and Azure Storage to Zendesk and SAP. When there isn’t a built‑in connector that suits your requirements, you can always write code in an Azure Function and call it from a Logic App. So even though Logic Apps are very powerful, it’s always good to know that when you hit a wall in terms of functionality, there’s a way to write code to accomplish what you need.
So for an example of how these can work together, you could create a Logic App that watches an email account for an email with attachments, then cleanses the body of the email using an Azure Function. Then the Logic App could create a blob in an Azure storage account and store the email and the attachment there.
In terms of choosing one over the other, if you need a solution that calls well‑known APIs, Logic Apps are a good place to start because of all the connectors available.
If your solution needs to execute custom algorithms or do special data lookups, Azure Functions would be a starting place because you already know that you need to write code.
Creating an Azure Function
Let’s create an Azure Function. This will just be a simple HTTP trigger that returns HTML to the browser. I’ll start by going to All services and searching for Function Apps.
A Function App is the container that holds multiple functions. Click Create, and we get brought to the creation screen. Let’s create this Function App in the resource group from the previous module. Now we need to give this Function App a name. And similar to Azure App Services, this name needs to be unique across Azure because it’s suffixed with azurewebsites.net. So you can start to see the relationship here between Function Apps and Web Apps in the Azure App Service.
Next, we select to deploy code or a container. Because I’m using the free trial subscription here, only code is available. I’ll select the runtime stack as .NET, but you can see there are other options here, like Node.js and Java. I’ll leave the default framework version, .NET 6, and I’ll leave the default region too.
You can deploy Function Apps onto Linux or Windows. It just depends on the runtime stack you’ve selected. .NET runs on both, but not all the frameworks do.
And the plan is the most important thing here. The consumption‑based plan will take care of all the sizing and scaling of the VMs for us, and we’ll only be charged based on when the functions are called. The other options are grayed out because, again, I’m using the free Azure trial. But normally, you can select to create this Function App on an existing App Service plan right alongside your other web apps and API apps. Or you can choose the Function Premium plan, which adds some network and connectivity options and avoids having to warm up the underlying VMs, so the performance can be better. And this is where the Function Premium plan provides networking options to restrict access to only virtual networks, not the public internet.
On the Monitoring tab, we have the option to enable Application Insights for deep monitoring, just like with App Services.
Let’s skip the tags and create this Function App.
Once it’s created, let’s navigate into the Function App.
So this looks a lot like an App Service already. There are deployment slots, configuration, authentication, and custom domains. But under the Function grouping, there’s this Functions tab, and there aren’t any functions yet. So again, the Function App is the container, and you can have multiple functions here.
Okay, now let’s create the function. The first thing is the development environment. You can develop functions using VS Code or another editor with core tools installed like Visual Studio. Or you can develop right here in the portal in the editor. So let’s just stick with that. Next, we choose the type of trigger, so what’s going to cause this function to run? It could be an HTTP call to the endpoint, it could run on a timer, or this Function App could watch for events in Azure, like when a blob is added to a specific container in Azure Storage or a document changes in a Cosmos DB database. Let’s go with the HTTP trigger. This is how you would call the function from another program, like a Logic App for example. We can change the function’s name, and we can choose the authorization level. This has to do with whether or not the caller needs to supply a key, which is just a shared secret. So you can prevent unauthorized callers from causing this function to run and costing you money. Let’s just leave it wide open for the example though, and let’s create this function. Once it’s created, we’re brought into the function.
We’ve got some options along the left here. Let’s click Code + Test. That opens up the editor where you can modify the default code. This just gives you a starting place to see how the function is structured. The default code will write to the log, and it will look for a string in the query string value and send back a response over HTTP. You can write some really complex functions to interact with other services and perform whatever logic you want to code. But this is an easy‑to‑understand example, so let’s just stick with this.
Next on the menu is the Integration tab where you can see how the function is laid out and make modifications here. This is just an overview, so we won’t go into this. But let’s go back to the code and test, and let’s run this function. Let’s copy the function URL. So this is the endpoint that the caller would use. They could do that programmatically to get the results back, but let’s open up a new browser tab and paste this in. I’ll increase the font size. It says the function ran successfully and that we can pass a name in the query string, so let’s do that. And we get a personalized response. So functions are an easy way to deploy small packages of business logic onto a managed environment and can provide cost savings over hosting a full‑blown app service. In this module, you learned about computer options in Azure, starting with the service delivery models, then looking at virtual machines, containers, Azure App Service, and Azure Functions. In the next module, we’ll look at networking in Azure.
- Azure has a number of products for networking that allow you to create secure networks for your virtual machines and other Azure resources so those resources can communicate with each other and with the internet.
- The underlying physical network and components are managed by Microsoft, and you configure virtual versions of everything that you need.
- An Azure virtual network is a fundamental building block for your private network. A VNet enables many types of Azure resources to communicate.
- A virtual network has an address space that you define in Azure, which is a group of IP addresses that can be assigned to resources like virtual machines. Don’t worry about the notation here. This is called CIDR notation, and it’s a way of defining the group of IP addresses that can be allocated to resources. (172.16.0.0/16)
- A VNet is segmented into one or more subnetworks called subnets, which are allocated a portion of the VNet’s IP address space. Then you deploy Azure resources to a specific subnet.
- A VM is assigned to a subnet, and VMs can communicate with other VMs on the same network. But you can apply security rules to that traffic using network security groups, or NSGs. These allow you to filter network traffic by allowing or denying traffic into and out of the subnet.
- Virtual machines are deployed into virtual networks, but you can also deploy other Azure resources into a VNet, networking components, like Azure Firewall, Application Gateway, and VPN Gateway, and I’ll talk about those shortly. You can deploy data‑related resources like Redis Cache and Azure SQL Managed Instances, and analytics resources, like Azure HDInsight and Azure Databricks. And Azure Kubernetes Service gets deployed into a VNet also.
- And you can also configure App Services to have a private IP on your VNet, which enables private connections to App Services, which have traditionally only been available over the internet.
- We’ll talk about private endpoints later in this module.
- By default, resources assigned to one virtual network can’t communicate with resources in another virtual network. So there’s some inherent security controls built in, but you can enable that communication between virtual networks using a feature called VNet peering.
- You can enable VNet peering between virtual networks in the same region, as well as VNets in different Azure regions, and the traffic flows privately over Microsoft’s backbone network.
- You can connect an on‑premises network to an Azure virtual network also using a VPN gateway or using a service called ExpressRoute. We’ll talk more about those later in this module.
- Virtual machines on a VNet can communicate out to the internet by default. But in order for inbound communications to take place from the internet, the virtual machine needs to be assigned to public IP address. Well, technically, the public IP address gets attached to the network interface of the virtual machine. So each of these is a separate resource in Azure with their own configuration.
- I mentioned network security groups, or NSGs. You also use these to control the inbound and outbound traffic to the internet. You can assign a network security group to the subnet or directly to the network interface of a VM. Then you can filter traffic with rules based on the source and destination IP addresses, the ports being accessed, and the protocol being used, like TCP or UDP. We’ll look at NSGs later in this module.
- Now let’s talk about load balancing in Azure. In order to distribute traffic between virtual machines for high availability, you can create a load balancer. There are public load balancers in Azure, which load balance internet traffic to your VMs. You can actually use a public load balancer to allow traffic to your VM without needing to attach a public IP address to the VM. And there are also internal or private load balancers where traffic is coming from inside the network.
- A public load balancer can provide inbound connections to VMs for traffic coming from the internet. It can translate the public IP address to the private IP addresses of the VMs inside a VNet. It’s a high‑performance solution that can handle a lot of traffic, but it’s just a load balancing and port forwarding engine. It doesn’t interact with the traffic coming in.
- It just checks the health of the back‑end resources. When you’re exposing resources to the internet, particularly servers on your internal virtual network, you typically want more control over the traffic. That’s where Azure Application Gateway can offer more features and security for publishing applications to the internet.
- Application Gateway is a web traffic load balancer that exposes a public IP to the internet, and it can do things like SSL termination. So traffic between the client and the App Gateway is encrypted, but then the traffic between App Gateway and the back‑end virtual machines can flow unencrypted, which unburdens the VMs from costly encryption and decryption overhead.
- App Gateway supports autoscaling, so it can scale up and down depending on traffic load patterns. It supports session affinity for applications that require a user to return to the same web server after they’ve started a session. It can do rewriting of HTTP headers and can make routing decisions based on more than just the IP address and the port that was requested.
- And App Gateway also uses a service called Web Application Firewall, which protects your web applications from common exploits and vulnerabilities like SQL injection attacks and cross‑site scripting. So again, Application Gateway is more than just a load balancer.
- If you search for load balancing in the Azure portal, you’ll see descriptions of all the options. Besides Load Balancer and Application Gateway, there are two other options that relate to load balancing across different regions. Traffic Manager allows you to distribute traffic to services across global Azure regions.
- Front Door has more capabilities for application delivery.
- So in this module, we’ll look a little closer at some of the major components of virtual networking in Azure. We’ll create a virtual network and subnets. Then we’ll create a virtual machine and attach it to the existing VNet. Next, you’ll see how to use network security groups to allow traffic to the VM from the internet. After that, we’ll peer two virtual networks so the VMs on the VNets can communicate. Then we’ll discuss the options for connecting on‑premises networks to Azure using VPN Gateway and then ExpressRoute. Next, we’ll discuss Azure DNS for managing DNS services alongside your other Azure resources. And finally, we’ll talk about private endpoints in Azure, which bring platform services like App Services and storage accounts into your private virtual network. So next, let’s create a virtual network.
Creating an Azure Virtual Network (VNET)
Let’s create a virtual network and explore the configuration options. I’ll start by going to All services and searching for virtual network. Click this, and there aren’t any created yet, so I’ll click Create. And as always, we need a resource group. I’m going to create a new one, so I’ll just give it a name, and let’s call this vnet1, and I’ll place it in the closest region to me.
Next, let’s configure the IP address space for this VNet. This is called CIDR notation. The number after the slash tells how many addresses are in the range, starting at the number before the slash. So a /16 means there are about 64,000 IPs available in the address space. We can assign these IP addresses to virtual machines and other services that can be addressed within a VNet.
When you configure your IP address space, the IP addresses are private to your VNet. The only time it matters is when you want to connect this VNet with another network, like another VNet in Azure using peering or with your local network on‑premises using VPN Gateway or ExpressRoute. In that case, those IP addresses can’t overlap with this address space.
We can break this up into smaller blocks of IP addresses using subnets, and then we can apply security to a subnet. I’ll call this WebSubnet because I want to put web servers in this subnet. I’ll give it an address range that starts within the range of the VNet and has a smaller block of IP addresses. In CIDR notation, a larger number means a smaller group of IPs. So a /27 is only 32 IP addresses.
We can attach service endpoints to the subnet. Service endpoints allow traffic to specific services in Azure over the Microsoft backbone. So VMs on the subnet could connect to Azure SQL or Azure Storage without having to connect to the public endpoints on the internet. Let’s create this subnet, and let’s create another subnet. Let’s call this AppSubnet.
So I might put application servers on this subnet and have them only accessible from VMs on the web subnet. Then you can use network security groups to enforce that. I’ll give this subnet a range that starts higher than the highest IP available in the WebSubnet. And let’s make this a /24, so there are 256 IP addresses available on this subnet.
Let’s add this, and let’s move on to the Security tab. Here, you can enable a bastion host, which is a VM that lets you remote into the virtual machines in this VNet without having to connect to them directly, so that’s for security. We can enable DDOS standard protection. Every VNet comes with basic protection against distributed denial of service attacks. By enabling standard protection, you get additional metrics and access to experts within Microsoft if an attack is launched against one of your applications. That comes for an additional charge, which is why you have to enable this. Azure Firewall is an intelligent firewall security service. It can watch for patterns and alert you to traffic coming from known malicious IP addresses and domains and deny that traffic. But let’s leave these off, and let’s move ahead and create this VNet. Once the VNet is created, I’ll go to the shortcut to all VNets. And it’s not showing yet, so I’ll refresh the page. Okay, now let’s drill into this. Let’s make this full screen. On the menu here, you can see the IP address space we configured, and you can modify it from here. You can create and remove subnets. And down here, you can specify the DNS servers to use. You can let Azure handle DNS resolution for you, or you can add the IP address of your own DNS servers. DNS resolves domain names to the IP addresses of servers, so you might create your own network in a VNet with a VM for Active Directory, VMs for applications, and a VM for hosting DNS services. You might do that if you’re setting up a lab environment in Azure here, for example. Setting that VM as the DNS server here will allow all the VMs on the network to resolve your internal domain names to the IPs of the servers, but you can actually use a service called Azure DNS for that also. And on the tab for peerings, you can peer this VNet with other VNets in Azure, so the VMs and resources can communicate. If you have any resources that have been assigned IP addresses on the VNet, their network interfaces will show up here. We don’t have any, so let’s create a virtual machine next and add it to this VNet.